

Installing QCAD on macOS
Dieser Inhalt ist noch nicht in deiner Sprache verfügbar.
This section is for users of the macOS operating system. The setup file you need depends on your macOS version and on the processor type of your Mac.
For brevity, version numbers are shown as 3.x.x below. Replace this with the actual version number of the QCAD release you downloaded, for example 3.28.1.
Finding your macOS Version and Processor Type
Section titled “Finding your macOS Version and Processor Type”- Click the Apple icon in the top left corner of your screen.
- Choose About This Mac. The dialog shows the macOS version number underneath or beside the label macOS, for example 13.2. Write it down.
- The processor type is shown beside the label Processor or Chip. Older Macs have an Intel CPU, newer ones an Apple M1, M2, M3, M4 or M5 CPU (Apple Silicon). Note which one you have.
Getting the Correct Setup File
Section titled “Getting the Correct Setup File”Installation from a USB Flash Drive
Section titled “Installation from a USB Flash Drive”Insert the USB flash drive and double-click its icon on the desktop to show its contents.
- If you have an Apple M1, M2, M3, M4 or M5 processor, install
installation/3.x/macOS/qcad-3.x.x-pro-macos-11-13-qt6-arm64.dmg - If you have an Intel processor, the file depends on your macOS version:
- macOS 10.14, or 11.x / 12.x / 13.x:
installation/3.x/macOS/qcad-3.x.x-pro-macos-10.14-13.dmg - macOS 10.10, 10.11, 10.12 or 10.13:
installation/macOS/qcad-3.x.x-pro-macos-10.10-10.13.dmg - For a lower or higher version, use the installer that covers that version.
- macOS 10.14, or 11.x / 12.x / 13.x:
Installation from Download
Section titled “Installation from Download”If you purchased the downloadable version, use your browser to access your personal download area (see the e-mail you received after your purchase).
- Apple M1/M2/M3/M4/M5: click the link named “Download for ARM (M1, M2, M3, M4, M5)”
- Intel: click the link labelled “Download for 64bit Intel”
After the download has finished, use Finder to locate the file on your hard disk.
Installation
Section titled “Installation”Double-click the file you located in the previous section. It is a disk image that contains the QCAD application. Double-clicking shows its contents:
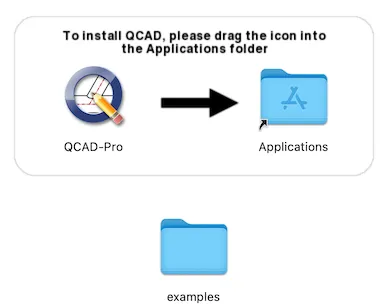
Drag the QCAD application icon on the left to the Applications folder that is shown on the right in the same Finder window.
Launching QCAD
Section titled “Launching QCAD”QCAD is now installed. To launch it, open the Applications folder and double-click the QCAD application icon.
Uninstalling
Section titled “Uninstalling”To remove QCAD, drag the QCAD icon from your Applications folder to the Trash in your dock.