

Resetting the QCAD Configuration
Introduction
Section titled “Introduction”If your configuration is somehow damaged and you cannot get it back to normal, you might want to reset QCAD to its default settings as they were when QCAD was first installed.
This will affect:
- arrangement and visibility of toolbars and dockable widgets
- arrangement and visibility of tools
- user interface language
- default settings for new drawings
- etc.
Step 1: Quitting QCAD
Section titled “Step 1: Quitting QCAD”Make sure that QCAD is closed before resetting the configuration.
Step 2: Deleting the QCAD Configuration File
Section titled “Step 2: Deleting the QCAD Configuration File”Windows
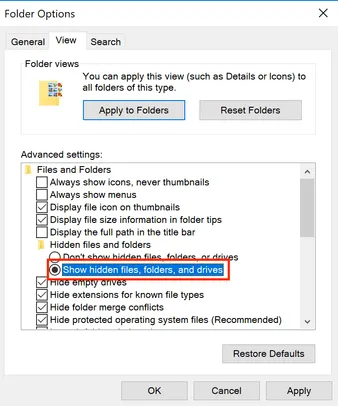
Section titled “Windows”Make sure that system files and system folders are displayed in Windows Explorer:
- Open Windows Explorer (e.g. Start > All Programs > Accessories > Windows Explorer)
- Windows XP: Tools > Folder Options > View > Show hidden files and folders
- Windows Vista, 7, 8, 10: View > Options > Change folder and search options > View > Show hidden files, folders, and drives
- Windows 11: Click the three dots in a Windows Explorer window at the top, then Options > View > Show hidden files, folders, and drives
The file QCAD3.ini is located in (where “username” is your login name):
- Windows XP:
C:\Documents and Settings\username\Application Data\QCAD\QCAD3.ini - Windows Vista, Windows 7, 8, 10:
C:\Users\username\AppData\Roaming\QCAD\QCAD3.ini
Note that Windows Explorer might not show the file extension (.ini) but only “QCAD3”.
- Delete or rename the file
QCAD3.ini - To reset the library browser, delete also the file
library_3_0_0_9.db - Start QCAD
- Delete the file
~/.config/QCAD/QCAD3.conf - To reset the library browser, delete also the file
~/.config/QCAD/library_3_0_0_9.db - Start QCAD
- Open Finder
- Choose menu Go > Go to Folder…
- enter
~/.config/QCAD - Click OK
- Delete file
QCAD3.ini - To reset the library browser, delete also the file
library_3_0_0_9.db - Start QCAD